In this lesson we start by learning the kanjis for storehouse 倉, tree/wood 木 and spear 槍. As you can see, 槍 is composed of 倉 and 木. 槍 is a phono-semantic compound with 木 being the semantic component (makes sense as most spears are wooden) and 倉 the phonetic component. This phonetic component can be found in multiple kanjis, including 創 and 槍, and is generally pronounced そう. Using the phonetic component for pronunciaton is called Onyomi. It is the way of pronouncing kanjis imported from china and korea between 500-900 A.D. Onyomi is mostly used when the word consists of multiple kanjis. For standalone kanjis you would use the more traditional Japanese pronunication like やり for 槍 or くら for 倉.
倉/庫
くら
storehouse
倉庫
そうこ
storehouse
穀倉
こくそう
granary
木
き
tree
槍
やり
spear
長い
ながい
long
長槍
ながやり
pike
投げる
なげる
to throw
投げ槍
なげやり
javelin
槍投げ
やりなげ
spear throw
槍を投げる
やりをなげる
throw a spear
槍兵
そうへい
spearman
As you can see, there are always exceptions to the rules. For example 長槍 does not use Onyomi despite being composed of multiple kanjis. In this kind of situation it is most common that you will see both kanjis using the Kunyomi pronunciation. Only few exceptions would use Onyomi+Kunyomi or Kunyomi + Onyomi. 長槍, 槍投げ and 投げ槍 are two nice examples how adjectives and verbs can be nominalized.
Write challenge: 倉/木
Exploration: 単/弾
弾倉
だんそう
magazine
銃弾
じゅうだん
gun bullet
弾道
だんどう
trajectory
簡単
かんたん
simple
単語
たんご
word, vocab
These two kanjis serve as an example that the Onyomi for the same phonetic component is not always the same, but are usually still extremely similar.
Furthermore, the listed words show in a nice way how efficient and literal kanji compositions are: A magazine is a storage of bullets. A trajectory is the way of a bullet.
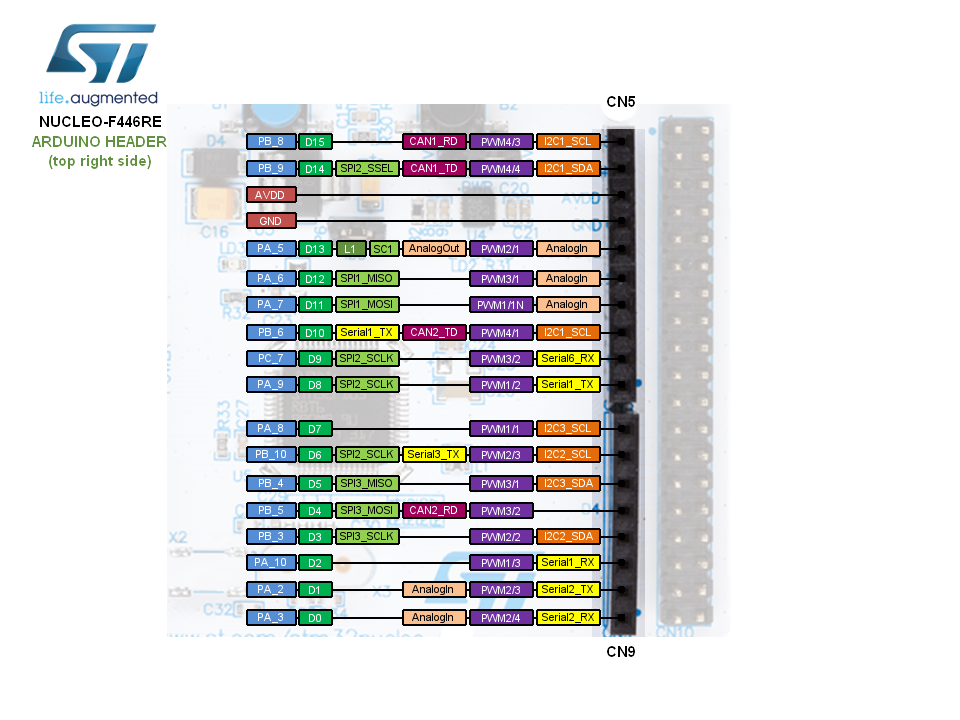
The Qorvo DWS1000 fits nicely on the arduino header of the Nucleo board. First of all, we have to make sure that all pins are correctly: The SPI pins for communicating with the DW1000 and the UART pins for debugging/logging.
Possible assignments on the right side of the Arduino Connector on the Nucleo board
Except for the CSn aka NSS pin: This must be pb6 instead of pa4. As part of the SPI configuration, we can manually assign a CS pin to the SPI device in the main function:
It’s good to create a helper function for transceiving simple commands to the DW1000, especially because the STM32 SPI driver has the peculiarity of invalidating the buffer pointer in the spi_bufs. In this article I focus only on the 1-byte TX n-byte RX commands of the DW1000:
I hope you like reading as much as me. But occassionaly you and I, we forget the words in the text, right? No problem, we think. We just have to lookup the word once in a dictionary and we are fine. But if you use Anki this induces a lot of problems: The vocabulary is not added to your Anki deck. Or if you have an Anki card for the word already, this card isn’t answered as incorrect whenever you look it up.
In this post I will provide a solution for these problems. Yomisama is already tightly coupled to Anki. Nevertheless a card should not be answered as incorrect as soon as you look it up. First, it might be counter-intuitive for those who want to use Yomisama only for creating new cards. Second, when you look up a word there might be multiple definitions and it’s not possible to programmatically choose the right one:
The solution requires a bit more work from us. As first step we have to turn a normal text file into a Yomichan deck. And as second step we read the entire file and all looked up words shall be answered as incorrect.
For this guide we take the first 2 sentences from ノルウェイの森 as example. If you want more, you can get the text copy-paste ready from ノルウェーの森 第一章.
Turn a text into a Yomisama deck
If you have Yomisama already opened, close it. Open Yomisama in a “clean state” in Anki by just pressing Ctrl-Y.
and do some formatting if necessary, e.g. making line breaks after every 。
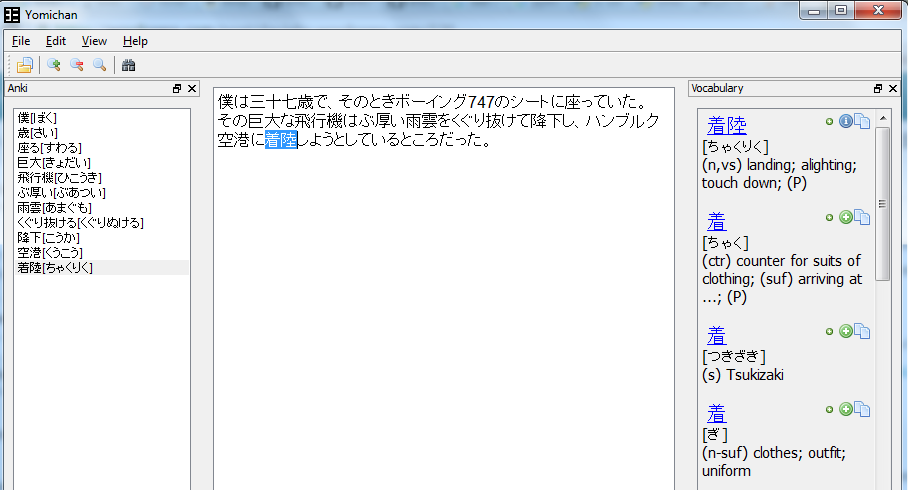
Add all interesting words to Anki that you can find. Not interesting words would be いる,その and similar super-easy words. You should end up with something like this (note the words in the Anki panel to the left):
Press Ctrl-S and save the file somewhere in the Yomisama subdirectory, e.g. as collection.media\Yomisama\NoruweiNoMori\1.1.txt
Close Yomichan.
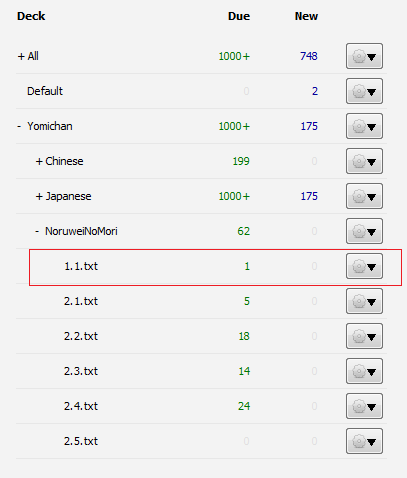
Press once on “Decks” on the top. Now you should be able to see an automagically created Yomisama deck called 1.1.txt:
The green number there shows how many cards are due in this deck. This helps to choose a proper text later when you want to re-read old texts.
Re-read a Yomisama deck
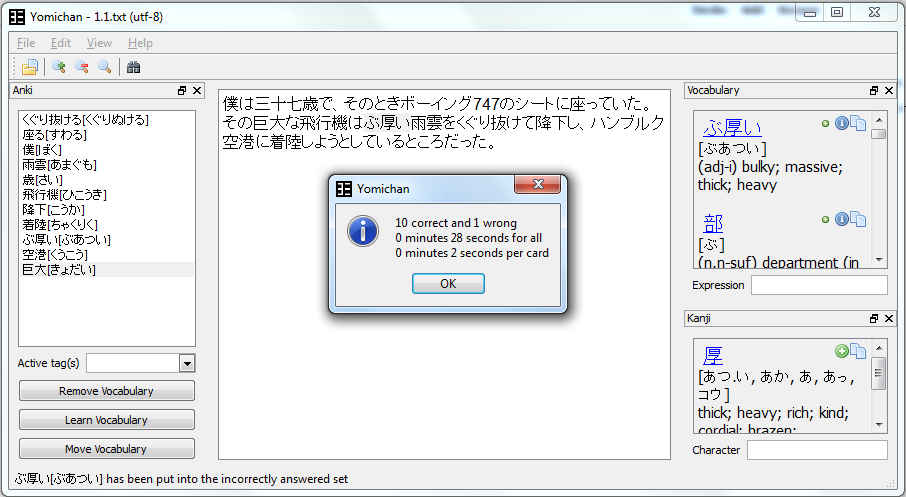
Click once on the Yomisama deck (e.g. on 1.1.txt) in the deck browser. This will open the corresponding file in Yomisama
Now read the text slowly again and simply look up any word that you have forgotten.
Click once on Learn vocabulary. This button answers all known words as correct and all forgotten words as incorrect.
Re-learn text-specific vocabulary outside of Yomisama
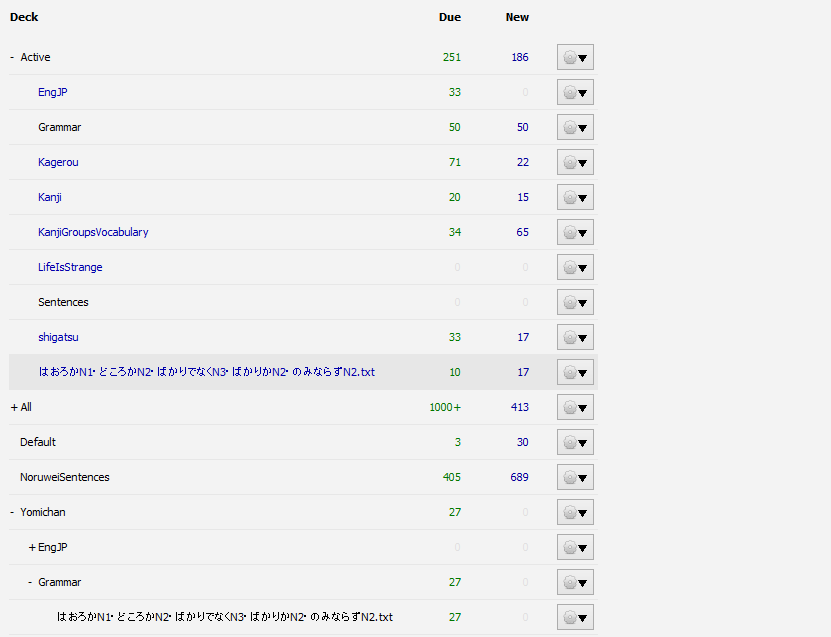
Simply drag a Yomisama deck outside to create a “filtered deck”
The result: An Anki deck that you can study as you are used to
If you have a lot of such filtered decks, I recommend installing the plugin Rebuild All as well. This creates an additional button at the buttom to quickly rebuild all filtered decks
Exporting Yomisama decks
You want to share your Yomisama decks so that other people can use it immediately, without the need of adding every single word manually? Just upload the .txt file somewhere in the internet (e.g. on http://www.pastebin.com – give your friends the raw link which they can save as .txt file in the collection.media\Yomisama folder by presssing Ctrl+S). I have the beginning of ノルウェイの森’s chapter 2 exported: 2.1.txt, 2.2.txt, 2.3.txt, 2.4.txt As soon as you open such a Yomisama deck once in Anki, all new cards are created.
Additional tricks
If you accidently looked up a word – and you don’t want it to be answered as incorrect – press Alt+R. It’s only possible for the last looked up word though.
If you want to practice some English->Japanese as well for certain words, then you can replace single Japanese words with an English equivalent. To do so, lookup the word you want to replace and press Alt+W. Now type in the English word. E.g. you can replace ぶ厚い with bulky. Make sure to save any changes!
This plugin is guaranteed to boost your reading speed, your vocabulary and, if you want, your listening comprehension! I want to credit Alex Yatskov at this point, the original developer of this plugin. You can find his website and what he has to write about Yomichan on http://foosoft.net/projects/yomichan/. Here I will explain the most basic functions of Yomichan, which are looking up definitions and creating Anki cards.
After you have installed and opened it, click in the program on Tools -> Add-Ons -> Browse&Install. Enter the number 907186589 there. That’s the ID of this neat plugin
Install one more plugin, namely 1759073496, to install support for European languages in Yomichan
Request the German->English (or any other German->…) dictionary file from here, unzip it and save the contained text file as \Anki\addons\yomi_base\languages\german\de-eng.txt
Restart Anki
Looking up Definitions
To open Yomichan press ctrl+Y. Paste some text into the center. In order to look up definitions, hover your mouse over the first letter of the word that you want to look up and then press the Lookup Key (which is F1 for me). If you are unsure where a word starts, just hover over all letters and lookup the words. Usually the longest words are the correct ones. If you can’t see the definition, you might need to toggle it on (View -> Vocabulary).
Creating cards
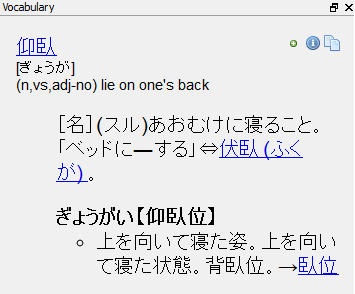
A screenshot of Yomichan and its most important fields
Vocabulary panel – here the definitions show up
By clicking on the green or blue button, you add a card to your Anki deck. The blue button is an indicator that such a card exists already. Clicking on a blue button overwrites the existing card.
Anki panel – contains the vocabulary that you added to Anki. By double-clicking on a word here, you get to the correct entry in the deck browser. There you can manually edit the card, if you want
Setting up Yomichan
In Yomichan, click on Edit -> Preferences. You should see the following window
For now, only the Lookup key is important. Here it is F1, which is working fine for me, but you have a few choices here. That’s the key with which you can lookup definition of words.
If you click on the Anki tab in the preferences, you will get:
This window describes how new notes will be created. It is confusing on the first look, but the default values here should be already fine for standard usage. The target deck can be selected next to “Deck”. The different fields can be filled with any text and even HTML. By adding tags, like {expression}, you can add different parts of the definition to the note. Be sure to check “Put new/overwritten cards into the learning queue”, if you want to learn the added cards immediately (there is no reason not to!) The tags will be set as follows (assumed you add the word Süßigkeiten, as in the first screenshot)
{expression}: Süßigkeiten
{gender}: {pl}. For female words this becomes {f}, male words are {m} and neutral words are {n}
{summary}: Same as {expression}
{glossary}: maple candy
{line}: In jenen Tagen wohnte Sherlock Holmes noch in der Baker Street in London, … the entire paragraph, because line breaks are missing
{sentence}: Aber das Essen war besser, und ich erzähle euch lieber erst gar nicht, wie billig und wie gut damals die Süßigkeiten waren, denn sonst läuft euch nur das Wasser im Mund zusammen.
{filename}: narnia1.txt
{language}: German
Click on Ok
Well, that’s it for now! I expect you to know how to find the definitions of words and add notes to Anki now. The next article will cover how we can use this plugin to train reading and listening comprehension.
In addition to the plugins you had to install in Yomisama – Basic functions, you need the plugin 2020888935 as well for this guide.
Here we learn to create cards with subtitles, video and audio from a snippet in a movie.
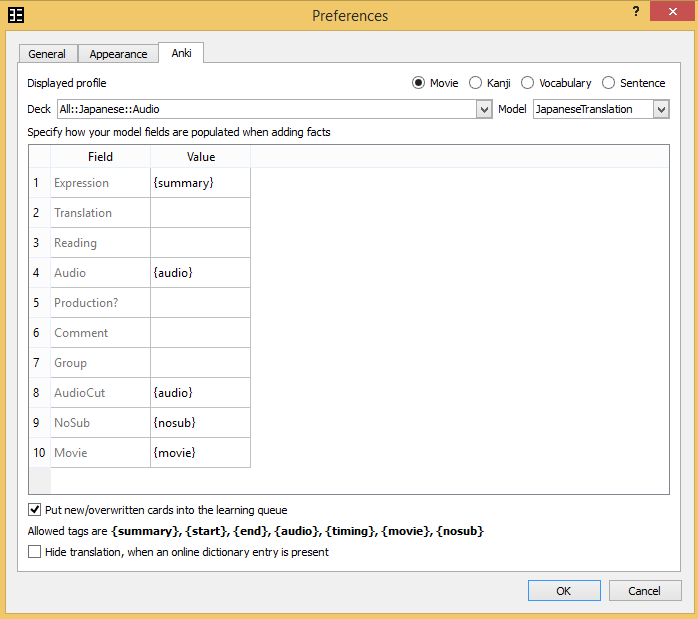
First of all, we have to setup the preferences (Edit > Preferences > Anki > Movie) for our movie cards. {summary} will contain the text, {audio} the link to the audio file and {movie} the link to the video snippet. My recommendated setup looks like
Put the video files (.mp4 or .mkv) together with the subtitles (.srt) into the Yomisama directory. Make sure that the video file and the subtitles have the same name, e.g. shigatsu.mp4 and shigatsu.srt
Create a third file, shigatsu.txt, that makes Yomisama recognize “here is something”.
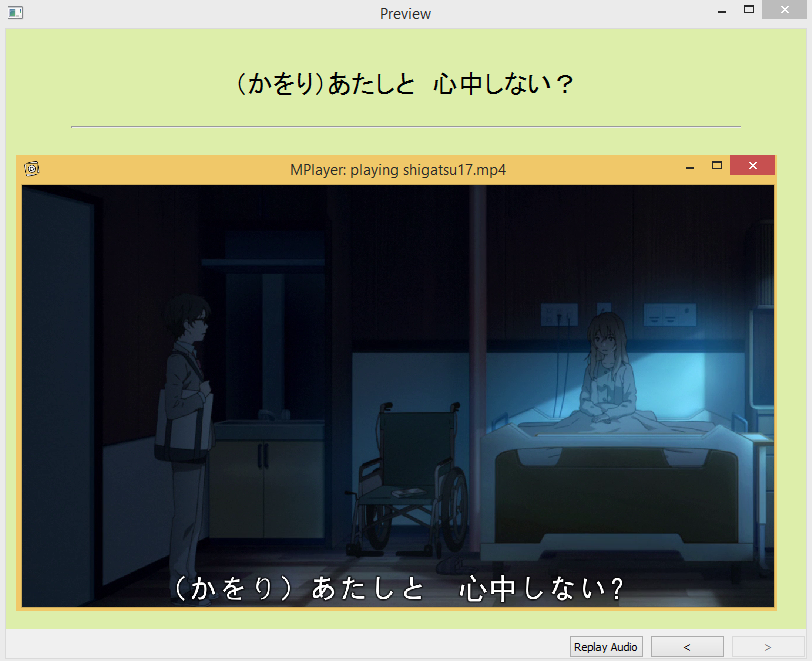
While watching the movie, press N to create a movie card.
After creating several movie cards you can save the Yomisama file, which helps with structuring the Anki cards and allows you to export it for other people.
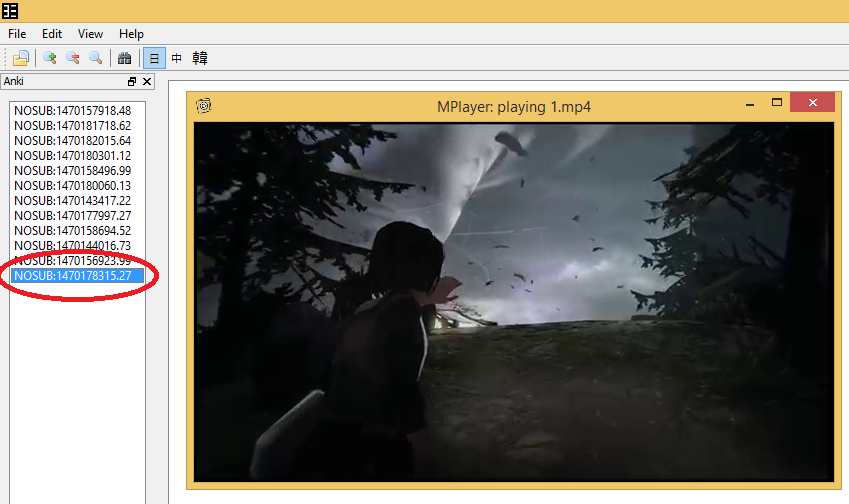
Working with non-subtitled videos
Simply do the same as described above, just without the .srt file
If you press N while watching a movie, a card will be created that contains the last 10 seconds
If you don’t want the entire 10 seconds, install the plugin Edit Audio Images.
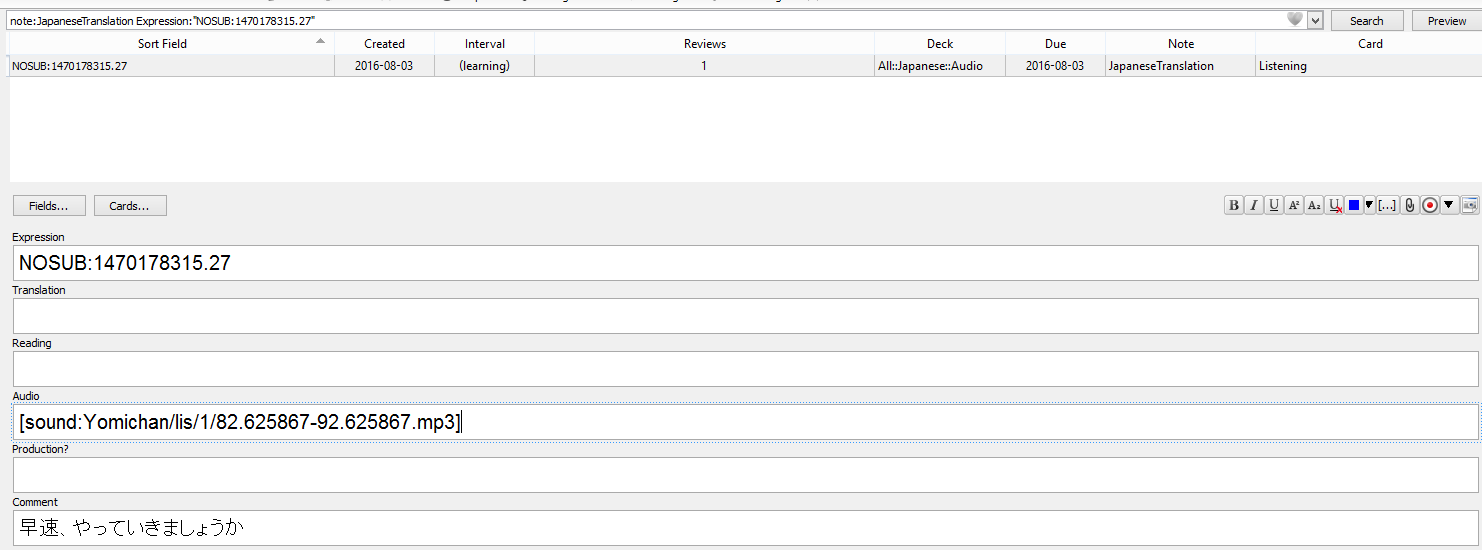
Go into the card browser
There click on the audio field
Now press F10, which opens the default program that you have associated with the file type
To actually edit it, I recommend installing Audacity
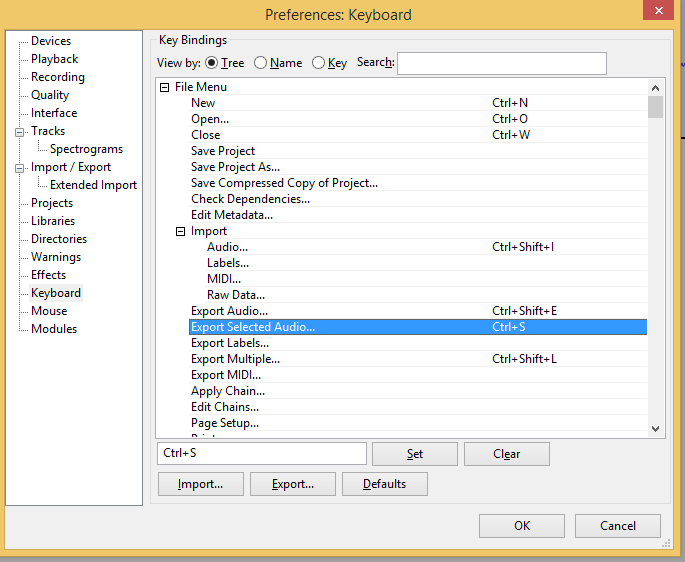
In Audacity, go into edit>preferences>keyboard and set the hotkey ctrl+s for Export Selected Audio…
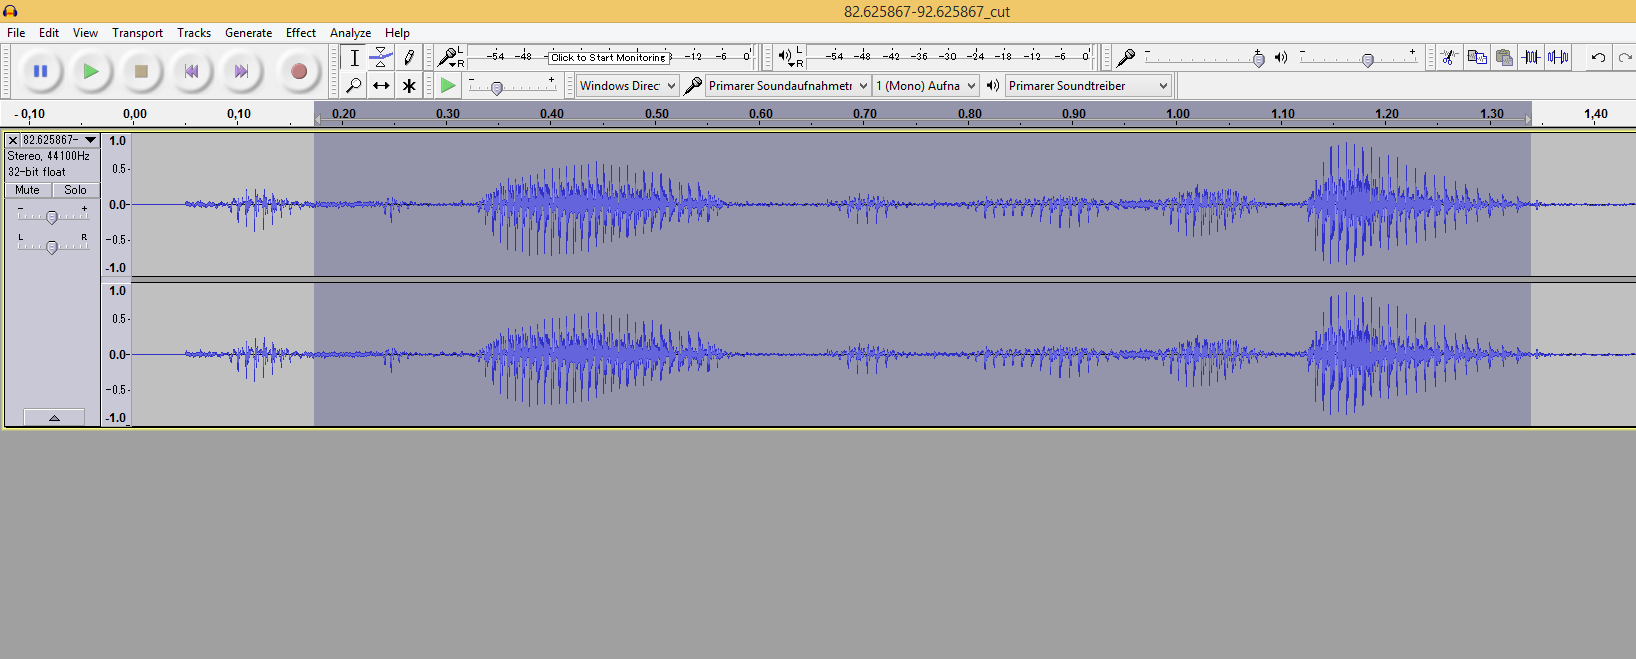
Select the audio that you want to have exported and press ctrl+t to cut off the rest
Press ctrl+s to save the changes as .mp3. Make sure that you overwrite the old .mp3 – otherwise Anki does not know where you saved it.
If you run into any lame_enc.dll issues, install the .exe version from http://lame.buanzo.org/ and while saving the .mp3, choose C:\Program Files (x86)\Lame For Audacity\lame_enc.dll as path for the .dll
In this tutorial we are exploring ways to learn kanjis that share the same phonetic component. Phonetic components are the part of the kanji that tell us how to pronounce it. For example, all the kanjis 甫, 捕, 哺, 匍, 補, 蒲, 舗 share the same phonetic component 甫, which tells us to pronounce them as ほ. The goal of this tutorial is to setup Anki and the plugin Yomisama so that it becomes easy to study these kanjis and words containing these kanjis. In case you haven’t done it already, I highly recommend reading the Yomisama – Basic functions first. じゃあ、はじめようじゃないか?
Find and add words with kanjis that share the same phonetic component
Open Yomisama (ctrl+y) and make sure the kanji panel is open (View > Kanji)
Paste one arbitrary kanji, e.g. 哺, into Yomisama and look it up (press F1 while hovering over it)
In the kanji panel you can see a list of kanjis that contain 甫: 甫脯哺輔鬴尃盙捕補晡埔悑庯鋪舖誧鯆酺圃痡莆匍葡浦蒲. Click on this list.
The vocabulary panel will now be filled with words that contain these kanjis, and the kanji panel is filled with the kanjis themselves
Now you can add words from the vocabulary panel directly – or you can filter the vocabulary for a specific kanji by clicking on the kanji itself in the kanji panel
For some kanjis there are no words at all. These are merely Chinese remnants and can be safely ignored!
Create Yomisama files for kanjis and study them in filtered decks
Go to your Yomisama media directory (~ C:\Users\David\Documents\Anki\User 1\collection.media\Yomichan) and create a directory called KanjiGroups in there
Now click again on 甫脯哺輔鬴尃盙捕補晡埔悑庯鋪舖誧鯆酺圃痡莆匍葡浦蒲 in the kanji panel. This should create now a file called 甫脯哺輔鬴尃盙捕補晡埔悑庯鋪舖誧鯆酺圃痡莆匍葡浦蒲.txt
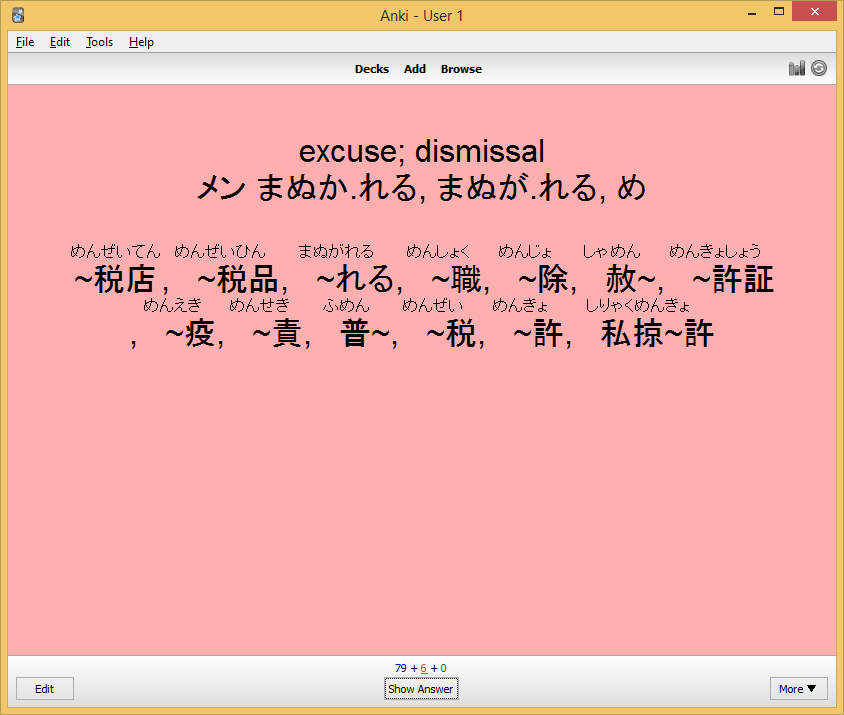
Reload the Anki decks (press on Decks in Anki on the top) and click on the Anki deck Yomisama > KanjiGroups > 甫脯哺輔鬴尃盙捕補晡埔悑庯鋪舖誧鯆酺圃痡莆匍葡浦蒲.txt, after which you should be able to see:
By adding more words that contain one of these kanjis, the vocabulary list in the middle will grow as well. You can choose to study these words as described in Repeated Intensive reading
If you rather want to learn them the normal Anki way, you need to create a filtered deck: In Anki press F and enter the following search query: (deck:”Yomisama::KanjiGroups”) (is:due or is:new) and choose the cards to be selected randomly and allow rescheduling of the cards.
Press Rebuild and enjoy studying this deck.
Create kanji cards
In Yomisama you can create cards for kanjis as well. Just click on the plus next to a kanji in a kanji panel.
If you use the {words} tag in Edit>Preferences>Anki>Kanji, you will end up having cards similar to:which I highly recommend if you want to practice writing kanjis. In fact I think it’s most efficient if this is your only writing practice in Anki and if you use the other methods described above for comprehension practice
In Yomisama – Basic functions we learned how to quickly create cards with English definitions. Now we learn how to pull definitions from an online dictionary, like dictionary.goo.jp, to create awesome monolingual cards.
Lookup a word as you are used to do.
Click on the [Goo] below the English definition.
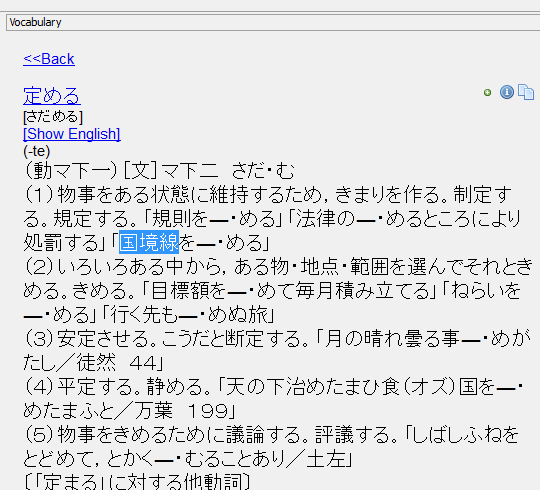
After a moment, you should be able to see a Japanese definition:
Be sure to have {goo} somewhere in the vocabulary profile preferences (Edit > Preferences > Anki > Vocabulary):
In this preferences window, you can decide whether you want to check “Hide translation, when an online dictionary entry is present” or not. This will hide the English translation in Yomisama itself, after you have clicked on [Goo].
By adding a card, the created notes and cards will contain this monolingual definition now:
To get rid of the English translation on the card, change the card template from something like {{Vocabulary-English}} to{{^Definition}}{{Vocabulary-English}}{{/Definition}} . If you don’t know where to accomplish that, please refer to http://ankisrs.net/docs/manual.html#templates
There might be words for which no goo definition can be found. If you happen to meet such words, feel free to mention them in the comments so that I can fix it 🙂
If those definition fetches from the internet take too long, I even have an offline 三省堂 大辞 dictionary file available. Please write me an email (dayjaby@gmail.com) to receive installation instructions.
In this version you can even lookup words within the definitions. Just select a word and press the lookup key. In the above example, I selected 国境線 and its definition pops up after pressing F1.
I believe that the Anki plugin “Yomisama” is by far the best thing ever invented, and not only because I am actively developing it at the moment. This plugin is guaranteed to boost your reading speed, your vocabulary and, if you want, your listening comprehension! I want to credit Alex Yatskov at this point, the original developer of this plugin, originally called Yomichan. You can find his website and what he has to write about Yomichan on http://foosoft.net/projects/yomichan/. Here I will explain the most basic functions of Yomisama, which are looking up definitions and creating Anki cards.
After you have installed and opened it, click in the program on Tools -> Add-Ons -> Browse&Install. Enter the number 907186589 there. That’s the ID of this neat plugin
Install one more plugin, namely 2027900559, to install the dictionary files.
Restart Anki
Looking up Definitions
To open Yomisama press ctrl+Y. Paste some text into the center. In order to look up definitions, hover your mouse over the first letter of the word that you want to look up and then press the Lookup Key (which is F1 for me). If you are unsure where a word starts, just hover over all letters and lookup the words. Usually the longest words are the correct ones. If you can’t see the definition, you might need to toggle it on (View -> Vocabulary).
Creating cards
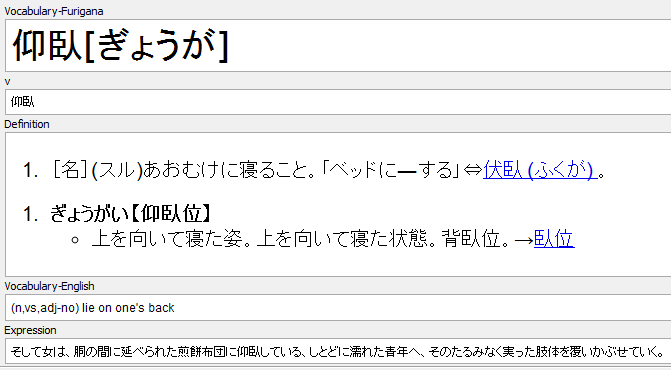
A screenshot of Yomisama and its most important fields
Name of the opened text file
Editor field
Vocabulary panel – here the definitions show up
By clicking on the green or blue button, you add a card to your Anki deck. The blue button is an indicator that such a card exists already. Clicking on a blue button overwrites the existing card.
Link to the jisho definition of the word (here: http://jisho.org/search/降り出す)
Kanji panel – the same as for vocabulary, just with the kanjis listed
Added vocabulary – by double-clicking on a word here, you get to the correct entry in the deck browser. Here you can manually edit the card, if you want
Do not touch these buttons! They are very sensible! I will cover their awesome features in the next article.
Setting up Yomisama
In Yomisama, click on Edit -> Preferences. You should see the following window
For now, only the Lookup key is important. Here it is F1, which is working fine for me, but you have a few choices here. That’s the key with which you can lookup definition of words.
If you click on the Anki tab in the preferences, you will get:
This window describes how new notes will be created. It is confusing on the first look, but the default values here should be already fine for standard usage. The target deck can be selected next to “Deck”. The different fields can be filled with any text and even HTML. By adding tags, like {expression}, you can add different parts of the definition to the note. Be sure to check “Put new/overwritten cards into the learning queue”, if you want to learn the added cards immediately (there is no reason not to!) The tags will be set as follows (assumed you add the word 降り出す, as in the first screenshot)
{expression}: 降り出す, if you click on the big button and ふりだす if you click on the small button (Hiragana-only)
{reading}: ふりだす, or nothing if you click on the small button
{summary}: 降り出す[ふりだす], if you click on the big button and ふりだす if you click on the small button (Hiragana-only)
{glossary}: (v5s,vi) to begin to rain; to begin to snow
{line}: 降り出す前一瞬の
{sentence}: the entire text, because punctuation is missing
{filename}: indigo la End 「夜汽車は走る」.txt
{t0}, ({t1}, …): the first (second, …) tab-separated field in the current line – useful if you have tab-separated files
{goo}: The Japanese definition from dictionary.goo.jp
Click on Ok
Well, that’s it for now! I expect you to know how to find the definitions of words and add notes to Anki now. The next article will cover how we can use this plugin to train reading and listening comprehension.


 which I highly recommend if you want to practice writing kanjis. In fact I think it’s most efficient if this is your only writing practice in Anki and if you use the other methods described above for comprehension practice